
 Carving pumpkins has always been a big deal in my family. The older my siblings and I became the more intricate the designs became. Unfortunately I am allergic to pumpkins. As of early last year all my siblings have moved out, leaving no one to carve pumpkins, so I needed a new idea. I decided to do no-carve pumpkins; it was a way to still decorate pumpkins without it ending with hives. I basically just paint and glue stuff to pumpkins instead of carving them. I did this last year and I really liked how they turned out, so I decided to do it again this year.
The Confetti Pumpkin:
Supplies:
- Confetti
- White Paint
- Glue or Mod Podge
- A Pumpkin
Instructions:
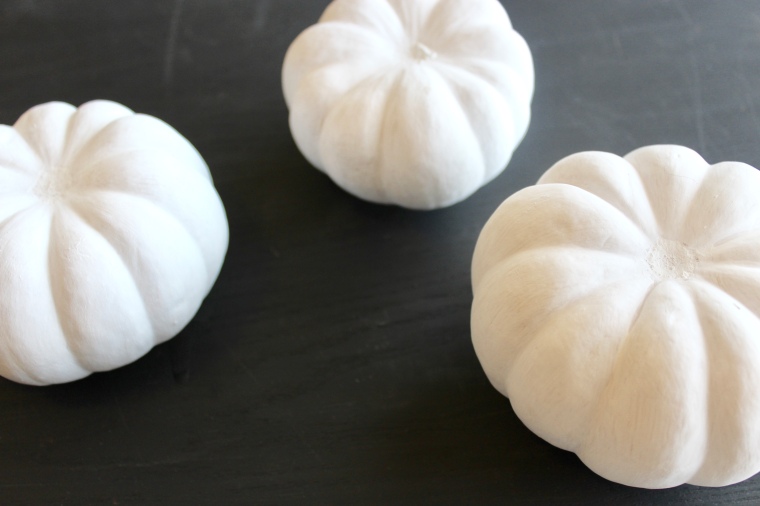
- I painted all the pumpkins I bought white and let them dry overnight. It took two coats of paint.
- Glue the confetti to the pumpkin. Their is no real technique for this, but I found doing one layer, waiting for it to dry, then doing another layer of confetti worked the best.


Unicorn Pumpkin:
Supplies:
- Glue
- Glitter (two different colors)
- Hot Glue Gun
- White Paint
- Paper
- Black Acrylic Paint or Black Paint Marker
- Foam sheets, the color doesn’t matter
- Pink Jewels (optional)
Instructions:
- Paint your pumpkin white

2. Cut four triangles out of the foam sheets. Two big and two small, the size of them should depend on the size of your pumpkin. You will also need to cut out this weird sort of triangle shape from paper; it will be the horn. 
3. Cover the ears and horn in glitter. I made the big triangles gold and the smaller ones silver. 
4. Once dry, glue the triangles together. Roll the horn and glue it using the hot glue.
5. Using hot glue attach the horn and ears to your pumpkin.
6. Using black paint or a paint marker, paint the eyes and mouth. 
7. This step is optional, but I took some pink jewels and glued them on to give my unicorn rosie cheeks. 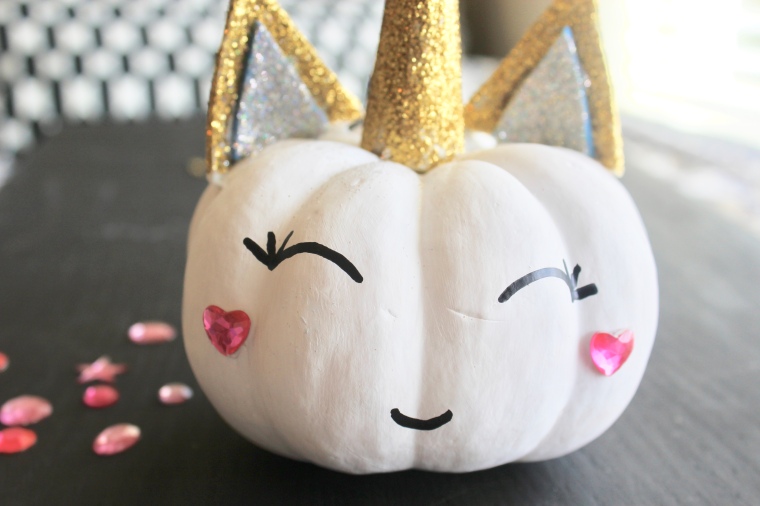

Melting Silver Pumpkin:
All you need for this one is white paint, metallic paint, and a paint brush. Then just take your metallic paint and drip it down the sides of your pumpkin. Use the brush to paint the top of your pumpkin. This one is definitely the easiest. 


I hope you liked this post and happy halloween x

These are so so cute!!! Very creative and easy to recreate – you have a lovely blog!!
https://thehoneyhouseblog.wordpress.com
LikeLiked by 1 person
Thank you💕 love your blog
LikeLiked by 1 person
What a neat idea – I think I am going to try this. You are very talented. Love you Blog!
LikeLiked by 1 person
Thank you so much!💕💕 If you do make them I would love to see them
LikeLike
SO beautiful! i love these ❤ Thanks for sharing! 🙂
LikeLiked by 1 person
Thank you💕
LikeLike
Love! 💎
LikeLiked by 1 person
Thank you so much!
LikeLiked by 1 person
Love the ideas! xx
LikeLiked by 1 person
Thank you 💖
LikeLiked by 1 person
You are welcome! 🙂
LikeLiked by 1 person